Status of the LED Indicator
The LED indicator on the upper right of HHKB Studio indicates the status of the keyboard.
Various statuses are displayed by combining the four LED indicator lights.

Immediately after the power is turned on, or when checking the profile in use and the connected device
Order of Light Up |
Status |
Description |
|---|---|---|
1 |
All four lights light up once in white |
Indicates that the keyboard is turned on. |
2 |
The light corresponding to the number of the profile that has been applied lights up once in white |
Indicates the profile that has been applied. The light corresponding to the number of the profile (Profile1 to Profile4) lights up once in white. (The figure shows an example of the LED indicator when Profile1 has been applied) |
3 |
Bluetooth connection: The light corresponding to the device to be connected lights up once in blue USB connection: All four lights light up once in blue |
Indicates the connection status of the keyboard.
|
During use
Status |
Description |
|---|---|
|
The lights turn off |
Indicates any of the following statuses:
|
|
The leftmost light blinks in orange |
When the light blinks in orange once every 30 seconds, the remaining battery power is low. When the light blinks in orange twice every 15 seconds, replace the batteries. |
When establishing/switching a connection (Bluetooth/USB)
Status |
Description |
|---|---|
|
The lights light up one after the other from side to side |
The keyboard is in pairing standby mode. Press [Fn] + [Control] + any of the [1] to [4] number keys to enter the pairing mode. |
|
The light corresponding to the device to be connected blinks quickly in blue (five times per second) |
The keyboard is in pairing mode. The keyboard is ready to be connected to the device via Bluetooth. The light corresponding to the number key (1 to 4) to which the pairing information for the connected device is assigned blinks quickly in blue. (The figure shows an example of the LED indicator when pairing information is assigned to the number [2] key) |
|
The light corresponding to the device to be connected lights up in blue, then turns off |
The keyboard is waiting for the device to be connected again via Bluetooth. The light corresponding to the number key (1 to 4) to which the pairing information for the connected device is assigned lights up in blue. (The figure shows an example of the LED indicator when the keyboard is waiting for the device assigned to the number [2] key to be connected via Bluetooth) The light will turn off after the connection is established. |
|
All four lights light up in blue, then turn off |
The keyboard is waiting for the device to be connected via USB. The lights will turn off after the connection is established. |
When switching between profiles
Status |
Description |
|---|---|
|
The light corresponding to the number of the profile that has been applied blinks in white (once per second) |
The keyboard is in profile switching mode. The light corresponding to the number of the profile (Profile1 to Profile4) that has been applied blinks in white. (The figure shows an example of the LED indicator when Profile1 has been applied) Press any of the [1] to [4] number keys to switch the profile to be used. |
|
The light corresponding to the number of the profile that has been switched to lights up in white, then turns off |
The profile has been switched. The light corresponding to the number of the profile (Profile1 to Profile4) that has been switched to lights up in white. (The figure shows an example of the LED indicator when the profile is switched to Profile2) The light will turn off after the profile is switched. |
When adjusting input device operations
Status |
Description |
|---|---|
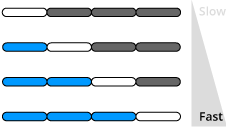 The lights corresponding to the set value light up once in blue and white |
The speed of the pointing stick has been changed by the key operation. As shown on the left, the number and color of the LED indicator lights vary depending on the set value. When the speed reaches the maximum or minimum speed, the LED indicator blinks twice in white. |
|
All four lights light up once in white |
The pointing stick is temporarily enabled by the key operation. |
|
The lights at both ends light up once in white |
The pointing stick is temporarily disabled by the key operation. |
|
One to four lights corresponding to the set value light up once in white from the left |
The sensitivity of the gesture pads has been changed by the key operation. The number of LED indicator lights that light up varies depending on the set value.
|
|
The light corresponding to each gesture pad lights up once in white or turns off depending on the set value. |
The gesture pads are temporarily enabled/disabled by the key operation. The LED indicator status varies depending on the gesture pad settings. Each LED indicator light from the left shows the setting status of the gesture pad on the left side, front left side, front right side, and right side, respectively.
(The figure shows an example of a case where only the gesture pad on the left side is enabled and the others are disabled) |