Replacing the Key Switches
The key switches of HHKB Studio can be replaced with our optional parts or commercially available compatible parts.
For the suppliers of our optional parts, refer to "Suppliers of Optional Parts" in Customer Support.
Replace the key switches at your own risk.
The key switches may be damaged during replacement. Make sure that you read the following procedures carefully and use caution during replacement.
The key switches are replaceable only with the parts for HHKB Studio. Other HHKB products (Professional series) are not replaceable.
Replacing the key switches
When replacing the parts with commercially available parts, make sure that the parts are compatible with HHKB Studio.
The key switches are compatible with MX-style 3-pin and 5-pin normal profile mechanical switches (produced by Cherry, Gateron, and Kailh).
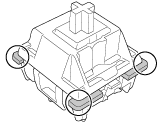
When replacing a key switch (G/B/H key) around the pointing stick with a commercially available part, the protrusions of the key switch (see the figure below) may interfere with the pointing stick. Therefore, carefully check the shape of the key switch in advance.
Prepare the following items:
New key switch

Remover

The remover provided with our optional parts can be used both for the key top & key switch.
Turn off the keyboard.
-
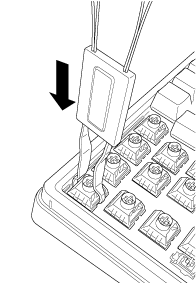
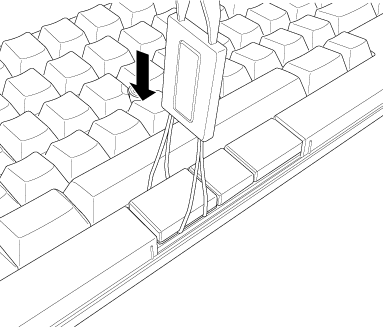
Remove the key top.
Insert the key top removing wire on the remover into the gap around the key top.

Hook the wire at the corner of the key top, and pull the remover straight upward slowly to remove the key top.

Remove the key top from the remover.
- Removing a wide-type key (space bar)
-
Insert the key top removing wire on the remover into the gap at the left side of key top.

Hook the wire at the corner of the key top, and pull the remover straight upward slowly to remove the left side of key top.
Be careful not to pull the key top too hard.

In the same way, remove the right side of key top.
Remove the key top from the remover.
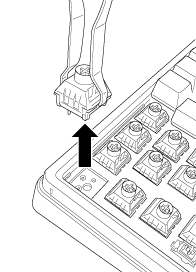
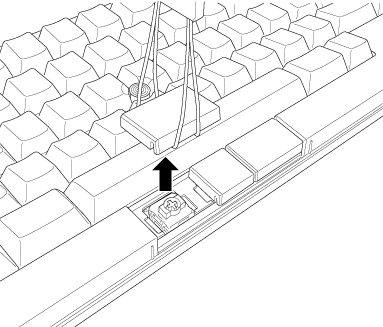
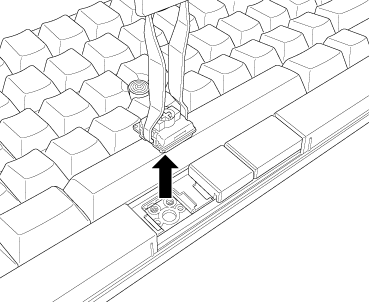
Remove the key switch.
Using the key switch removing wire on the remover, pinch the key switch at the top and bottom sides.
Pull the remover straight upward slowly to remove the key switch.
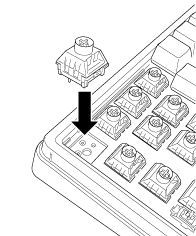
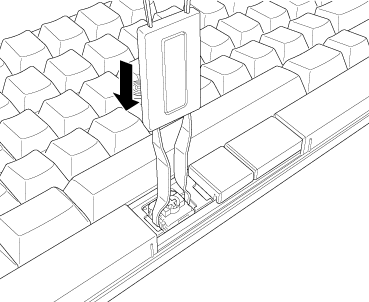
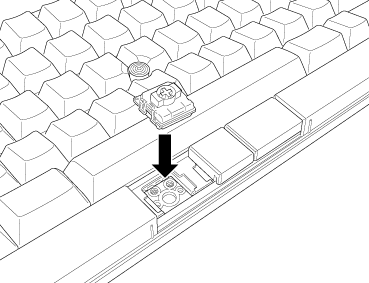
Install a new key switch.
Insert the key switch straight in the correct direction while checking its shape and the position of terminal.
Install the key top.
Install the key top in the correct direction by referring to the key top shape and layout.

Replacing the mouse key switches
When replacing the parts with commercially available parts, make sure that the parts are compatible with HHKB Studio.
The mouse key switches are compatible with MX-style low profile mechanical switches. Note that they are not compatible with normal profile mechanical switches.
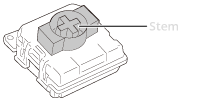
The stem shape varies across manufacturers and products, so carefully check that the stem is compatible with the mouse key top. PFU has verified the operation of switches equipped with the stem produced by Gateron (see the figure below).
Prepare the following items:
New mouse key switch

Remover
The remover provided with our optional parts can be used both for the mouse key top & mouse key switch.
Turn off the keyboard.
-
Remove the mouse key top.
Insert the key top removing wire on the remover into the gap around the mouse key top.
Hook the wire at the corner of the mouse key top, and pull the remover straight upward slowly to remove the mouse key top.
Remove the mouse key top from the remover.
Remove the mouse key switch.
Using the key switch removing wire on the remover, pinch the mouse key switch at the right and left sides.
Pull the remover straight upward slowly to remove the mouse key switch.
Install a new mouse key switch.
Insert the mouse key switch straight in the correct direction while checking its shape and the position of terminal.
Install the mouse key top.
Install the mouse key top in the correct direction by referring to the mouse key top shape and layout.
