Bluetooth Connection
Connect HHKB Studio and the device to be used via Bluetooth.
Pairing information for up to four Bluetooth devices can be registered to number keys [1] to [4] on the keyboard.
You can quickly switch between devices using the shortcut keys once pairing information is registered for the devices.
For details about how to switch devices, refer to Switching Between Devices to Be Connected.
When using a device that does not support Bluetooth, you need a commercially available Bluetooth USB adapter or the USB Type-C cable provided with the keyboard.
To use a commercially available Bluetooth USB adapter, make the Bluetooth function available by referring to the manual of the Bluetooth USB adapter.
Connecting (Pairing) for the First Time
When the keyboard is connected for the first time, the pairing information for the device to be used is registered to the number [1] key.
If you connect a USB cable to supply power when no pairing information is registered, the keyboard is automatically connected to the device via a USB connection. To switch to a Bluetooth connection, follow the procedure below.
-
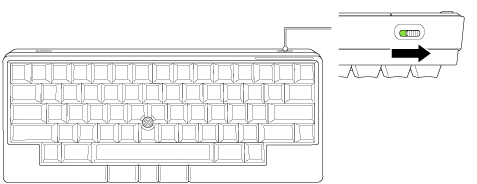
Turn on the keyboard.
Turn on the power by sliding the power switch on the back of the keyboard to the right (it will turn green).
-
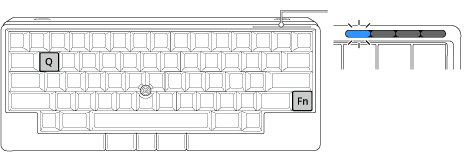
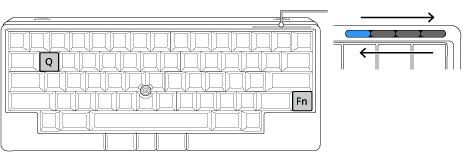
Set the keyboard in pairing mode.
Hold down the [Fn] key and press the [Q] key. Then wait for the leftmost LED indicator to blink quickly in blue (pairing mode).
 HINT
HINTTo exit the pairing mode, press the [Fn] + [X] keys.
Pair the keyboard with the device to be used.
- For Windows 11
-
Right-click the [Start] menu and click [Settings].
The [Settings] window appears.
Click [Bluetooth & devices] on the left side of the window.
The [Bluetooth & devices] window appears.
Turn on [Bluetooth] if it is off.
Click [Add device].
The [Add a device] window appears.
Click [Bluetooth].
Click [HHKB-Studio1], and click the [Next] button.
A several digit number for pairing is displayed.
Enter the displayed number for pairing using HHKB Studio.
When [Connected] is displayed for [HHKB-Studio1], the connection is established. The LED indicator will then turn off.
- For Windows 10
-
Right-click the [Start] menu and click [Settings].
The [Windows Settings] window appears.
Click [Devices].
The [Bluetooth & other devices] window appears.
Turn on [Bluetooth] if it is off.
Click [Add Bluetooth or other device].
The [Add a device] window appears.
Click [Bluetooth].
Click [HHKB-Studio1], and click the [Next] button.
A several digit number for pairing is displayed.
Enter the displayed number for pairing using HHKB Studio.
When [Connected] is displayed for [HHKB-Studio1], the connection is established. The LED indicator will then turn off.
The profile (key layout) for Windows is applied automatically when the keyboard is connected for the first time. Therefore, switching between profiles is not required.
-
Turn on the keyboard.
Turn on the power by sliding the power switch on the back of the keyboard to the right (it will turn green).
-
Set the keyboard in pairing mode.
Hold down the [Fn] key and press the [Q] key. Then wait for the leftmost LED indicator to blink quickly in blue (pairing mode).
HINTTo exit the pairing mode, press the [Fn] + [X] keys.
Pair the keyboard with the device to be used.
The menu names and window names vary depending on the operating system version.
Click the [Apple] menu and select [System Preferences] → [Bluetooth].
Click [HHKB-Studio1] and click the [Connect] button.
A several digit number for pairing is displayed.
Enter the displayed number for pairing using HHKB Studio.
If the [Connect] button is available, click it.
When [Connected] is displayed, the connection is established. The LED indicator will then turn off.
When the [Keyboard Setup Assistant] window appears, click the [Continue] button.
When the message "Press the key immediately to the right of the Shift key on the left side of the keyboard." appears, press the [Z] key.
When the message "Press the key immediately to the left of the Shift key on the right side of the keyboard." appears, press the [?/] key.
When [Select the Keyboard Type] is displayed, select [ANSI (United States and others)] and click the [Done] button.
-
Switch to the profile (key layout) for your OS.
A profile for each OS is saved as default. Profile1 (profile for Windows) is applied automatically when the keyboard is connected for the first time.
Switch the profile to Profile2 (profile for macOS) by following the steps below.
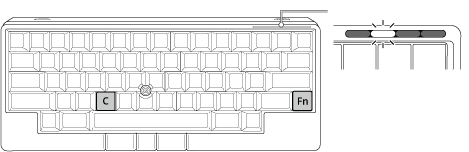
Hold down the [Fn] key and press the [C] key.
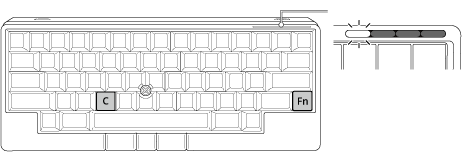
The keyboard enters the profile switching mode and the LED indicator light corresponding to the current profile number (Profile1 to Profile4) blinks in white.
As Profile1 is applied automatically when the keyboard is connected for the first time, the leftmost LED indicator light blinks.
HINTTo exit the profile switching mode, press the [Fn] + [X] keys.
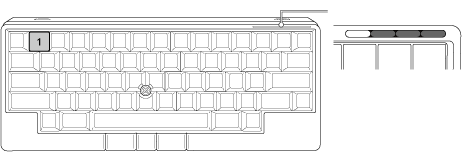
Press the [2] key.
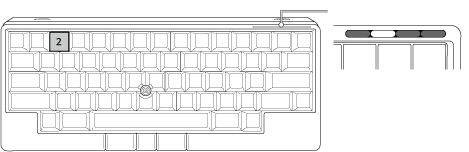
The profile is switched to Profile2 (profile for macOS) and the second LED indicator light from the left lights up in white.
The position of the LED indicator light that lights up shows the profile number after the switch.
The LED indicator light will turn off after the profile is switched.
-
Turn on the keyboard.
Turn on the power by sliding the power switch on the back of the keyboard to the right (it will turn green).
-
Set the keyboard in pairing mode.
Hold down the [Fn] key and press the [Q] key. Then wait for the leftmost LED indicator to blink quickly in blue (pairing mode).
HINTTo exit the pairing mode, press the [Fn] + [X] keys.
Pair the keyboard with the device to be used.
The menu names and window names vary depending on the iOS or iPadOS version.
Tap [Settings] → [Bluetooth].
Turn on [Bluetooth] if it is off.
Tap [HHKB-Studio1].
A several digit number for pairing is displayed.
Enter the displayed number for pairing using HHKB Studio.
When [Connected] is displayed for [HHKB-Studio1], the connection is established. The LED indicator will then turn off.
-
Switch to the profile (key layout) for your OS.
A profile for each OS is saved as default. Profile1 (profile for Windows) is applied automatically when the keyboard is connected for the first time.
Switch the profile to Profile2 (profile for macOS) by following the steps below.
Hold down the [Fn] key and press the [C] key.
The keyboard enters the profile switching mode and the LED indicator light corresponding to the current profile number (Profile1 to Profile4) blinks in white.
As Profile1 is applied automatically when the keyboard is connected for the first time, the leftmost LED indicator light blinks.
HINTTo exit the profile switching mode, press the [Fn] + [X] keys.
Press the [2] key.
The profile is switched to Profile2 (profile for macOS) and the second LED indicator light from the left lights up in white.
The position of the LED indicator light that lights up shows the profile number after the switch.
The LED indicator light will turn off after the profile is switched.
-
Turn on the keyboard.
Turn on the power by sliding the power switch on the back of the keyboard to the right (it will turn green).
-
Set the keyboard in pairing mode.
Hold down the [Fn] key and press the [Q] key. Then wait for the leftmost LED indicator to blink quickly in blue (pairing mode).
HINTTo exit the pairing mode, press the [Fn] + [X] keys.
Pair the keyboard with the device to be used.
The menu names and window names vary depending on the device that you use.
Tap [Settings] → [Connected devices].
Tap [Pair new device].
Tap [HHKB-Studio1].
A several digit number for pairing is displayed.
Enter the displayed number for pairing using HHKB Studio.
When "HHKB-Studio1" is displayed in [Available devices], the connection is established. The LED indicator will then turn off.
The profile (key layout) for Android is applied automatically when the keyboard is connected for the first time. Therefore, switching between profiles is not required.
Registering (Pairing) an Additional Bluetooth Device
-
Turn on the keyboard.
Turn on the power by sliding the power switch on the back of the keyboard to the right (it will turn green).
-
Set the keyboard in pairing mode.
Hold down the [Fn] key and press the [Q] key.
The keyboard enters pairing standby mode and the LED indicator lights light up one after the other, from side to side.
HINTTo exit the pairing standby mode or the pairing mode in step b, press the [Fn] + [X] keys.
If pairing information has not yet been registered, the keyboard enters a state where [Fn] + [Control] + [1] are pressed automatically in step b (pairing mode). Proceed to step 3.
Hold down the [Fn] key and press the [Control] key, and then press the number key (any of [1] to [4]) used to register the pairing information.
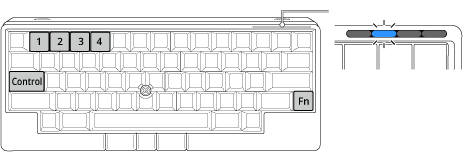
The keyboard enters pairing mode and the LED indicator corresponding to the pressed number key blinks quickly in blue.
For example, when the [Fn] + [Control] + [2] keys are pressed, the second LED indicator light from the left blinks as shown above.
The pairing information for the device to be used is registered to the specified number key.
-
If you specify a number key that already has pairing information registered to it, the old pairing information will be overwritten with new pairing information.
-
Pair the keyboard with the device to be used.
- For Windows 11
-
Right-click the [Start] menu and click [Settings].
The [Settings] window appears.
Click [Bluetooth & devices] on the left side of the screen.
The [Bluetooth & devices] window appears.
Turn on [Bluetooth] if it is off.
Click [Add device].
The [Add a device] window appears.
Click [Bluetooth].
Click [HHKB-Studio<n> (*1)], and click the [Next] button.
*1: The number of the number key (1 to 4) used to register the pairing information is displayed in place of "<n>".
A several digit number for pairing is displayed.
Enter the displayed number for pairing using HHKB Studio.
When [Connected] is displayed for [HHKB-Studio<n>], the connection is established. The LED indicator will then turn off.
- For Windows 10
-
Right-click the [Start] menu and click [Settings].
The [Windows Settings] window appears.
Click [Devices].
The [Bluetooth & other devices] window appears.
Turn on [Bluetooth] if it is off.
Click [Add Bluetooth or other device].
The [Add a device] window appears.
Click [Bluetooth].
Click [HHKB-Studio<n> (*1)], and click the [Next] button.
*1: The number of the number key (1 to 4) used to register the pairing information is displayed in place of "<n>".
A several digit number for pairing is displayed.
Enter the displayed number for pairing using HHKB Studio.
When [Connected] is displayed for [HHKB-Studio<n>], the connection is established. The LED indicator will then turn off.
-
Switch to the profile (key layout) for your OS.
When the keyboard is turned on, the last profile used will be applied automatically.
A profile for each OS is saved as default. To use the keyboard on Windows/Android, switch the profile to Profile1 (profile for Windows) by following the steps below as needed.
Hold down the [Fn] key and press the [C] key.
The keyboard enters the profile switching mode and the LED indicator light corresponding to the current profile number (Profile1 to Profile4) blinks in white.
For example, when Profile2 is used, the second LED indicator light from the left blinks as shown in the figure above.
HINTTo exit the profile switching mode, press the [Fn] + [X] keys.
Press the [1] key.
The profile is switched to Profile1 (profile for Windows) and the leftmost LED indicator light lights up in white.
The position of the LED indicator light that lights up shows the profile number after the switch.
The LED indicator light will turn off after the profile is switched.
-
Turn on the keyboard.
Turn on the power by sliding the power switch on the back of the keyboard to the right (it will turn green).
-
Set the keyboard in pairing mode.
Hold down the [Fn] key and press the [Q] key.
The keyboard enters pairing standby mode and the LED indicator lights light up one after the other, from side to side.
HINTTo exit the pairing standby mode or the pairing mode in step b, press the [Fn] + [X] keys.
If pairing information has not yet been registered, the keyboard enters a state where [Fn] + [Control] + [1] are pressed automatically in step b (pairing mode). Proceed to step 3.
Hold down the [Fn] key and press the [Control] key, and then press the number key (any of [1] to [4]) used to register the pairing information.
The keyboard enters pairing mode and the LED indicator corresponding to the pressed number key blinks quickly in blue.
For example, when the [Fn] + [Control] + [2] keys are pressed, the second LED indicator light from the left blinks as shown above.
The pairing information for the device to be used is registered to the specified number key.
-
If you specify a number key that already has pairing information registered to it, the old pairing information will be overwritten with new pairing information.
-
Pair the keyboard with the device to be used.
The menu names and window names vary depending on the operating system version.
Click the [Apple] menu and select [System Preferences] → [Bluetooth].
Click [HHKB-Studio<n> (*1)] and click the [Connect] button.
*1: The number of the number key (1 to 4) used to register the pairing information is displayed in place of "<n>".
A several digit number for pairing is displayed.
Enter the displayed number for pairing using HHKB Studio.
If the [Connect] button is available, click it.
When [Connected] is displayed, the connection is established. The LED indicator will then turn off.
When the [Keyboard Setup Assistant] window appears, click the [Continue] button.
When the message "Press the key immediately to the right of the Shift key on the left side of the keyboard." appears, press the [Z] key.
When the message "Press the key immediately to the left of the Shift key on the right side of the keyboard." appears, press the [?/] key.
When [Select the Keyboard Type] is displayed, select [ANSI (United States and others)] and click the [Done] button.
-
Switch to the profile (key layout) for your OS.
When the keyboard is turned on, the last profile used will be applied automatically.
A profile for each OS is saved as default. To use the keyboard on macOS/iOS/iPad OS, switch the profile to Profile2 (profile for macOS) by following the steps below as needed.
Hold down the [Fn] key and press the [C] key.
The keyboard enters the profile switching mode and the LED indicator light corresponding to the current profile number (Profile1 to Profile4) blinks in white.
For example, when Profile1 is used, the leftmost LED indicator light blinks as shown in the figure above.
HINTTo exit the profile switching mode, press the [Fn] + [X] keys.
Press the [2] key.
The profile is switched to Profile2 (profile for macOS) and the second LED indicator light from the left lights up in white.
The position of the LED indicator light that lights up shows the profile number after the switch.
The LED indicator light will turn off after the profile is switched.
-
Turn on the keyboard.
Turn on the power by sliding the power switch on the back of the keyboard to the right (it will turn green).
-
Set the keyboard in pairing mode.
Hold down the [Fn] key and press the [Q] key.
The keyboard enters pairing standby mode and the LED indicator lights light up one after the other, from side to side.
HINTTo exit the pairing standby mode or the pairing mode in step b, press the [Fn] + [X] keys.
If pairing information has not yet been registered, the keyboard enters a state where [Fn] + [Control] + [1] are pressed automatically in step b (pairing mode). Proceed to step 3.
Hold down the [Fn] key and press the [Control] key, and then press the number key (any of [1] to [4]) used to register the pairing information.
The keyboard enters pairing mode and the LED indicator corresponding to the pressed number key blinks quickly in blue.
For example, when the [Fn] + [Control] + [2] keys are pressed, the second LED indicator light from the left blinks as shown above.
The pairing information for the device to be used is registered to the specified number key.
-
If you specify a number key that already has pairing information registered to it, the old pairing information will be overwritten with new pairing information.
-
Pair the keyboard with the device to be used.
The menu names and window names vary depending on the iOS or iPadOS version.
Tap [Settings] → [Bluetooth].
Turn on [Bluetooth] if it is off.
Tap [HHKB-Studio<n> (*1)].
*1: The number of the number key (1 to 4) used to register the pairing information is displayed in place of "<n>".
A several digit number for pairing is displayed.
Enter the displayed number for pairing using HHKB Studio.
When [Connected] is displayed for [HHKB-Studio<n>], the connection is established. The LED indicator will then turn off.
-
Switch to the profile (key layout) for your OS.
When the keyboard is turned on, the last profile used will be applied automatically.
A profile for each OS is saved as default. To use the keyboard on macOS/iOS/iPad OS, switch the profile to Profile2 (profile for macOS) by following the steps below as needed.
Hold down the [Fn] key and press the [C] key.
The keyboard enters the profile switching mode and the LED indicator light corresponding to the current profile number (Profile1 to Profile4) blinks in white.
For example, when Profile1 is used, the leftmost LED indicator light blinks as shown in the figure above.
HINTTo exit the profile switching mode, press the [Fn] + [X] keys.
Press the [2] key.
The profile is switched to Profile2 (profile for macOS) and the second LED indicator light from the left lights up in white.
The position of the LED indicator light that lights up shows the profile number after the switch.
The LED indicator light will turn off after the profile is switched.
-
Turn on the keyboard.
Turn on the power by sliding the power switch on the back of the keyboard to the right (it will turn green).
-
Set the keyboard in pairing mode.
Hold down the [Fn] key and press the [Q] key.
The keyboard enters pairing standby mode and the LED indicator lights light up one after the other, from side to side.
HINTTo exit the pairing standby mode or the pairing mode in step b, press the [Fn] + [X] keys.
If pairing information has not yet been registered, the keyboard enters a state where [Fn] + [Control] + [1] are pressed automatically in step b (pairing mode). Proceed to step 3.
Hold down the [Fn] key and press the [Control] key, and then press the number key (any of [1] to [4]) used to register the pairing information.
The keyboard enters pairing mode and the LED indicator corresponding to the pressed number key blinks quickly in blue.
For example, when the [Fn] + [Control] + [2] keys are pressed, the second LED indicator light from the left blinks as shown above.
The pairing information for the device to be used is registered to the specified number key.
-
If you specify a number key that already has pairing information registered to it, the old pairing information will be overwritten with new pairing information.
-
Pair the keyboard with the device to be used.
The menu names and window names vary depending on the device that you use.
Tap [Settings] → [Connected devices].
Tap [Pair new device].
Tap [HHKB-Studio<n> (*1)].
*1: The number of the number key (1 to 4) used to register the pairing information is displayed in place of "<n>".
A several digit number for pairing is displayed.
Enter the displayed number for pairing using HHKB Studio.
When "HHKB-Studio<n>" is displayed in [Available devices], the connection is established. The LED indicator will then turn off.
-
Switch to the profile (key layout) for your OS.
When the keyboard is turned on, the last profile used will be applied automatically.
A profile for each OS is saved as default. To use the keyboard on Windows/Android, switch the profile to Profile1 (profile for Windows) by following the steps below as needed.
Hold down the [Fn] key and press the [C] key.
The keyboard enters the profile switching mode and the LED indicator light corresponding to the current profile number (Profile1 to Profile4) blinks in white.
For example, when Profile2 is used, the second LED indicator light from the left blinks as shown in the figure above.
HINTTo exit the profile switching mode, press the [Fn] + [X] keys.
Press the [1] key.
The profile is switched to Profile1 (profile for Windows) and the leftmost LED indicator light lights up in white.
The position of the LED indicator light that lights up shows the profile number after the switch.
The LED indicator light will turn off after the profile is switched.