Parts and Functions
This section describes the part names of HHKB Studio and their functions.
Front
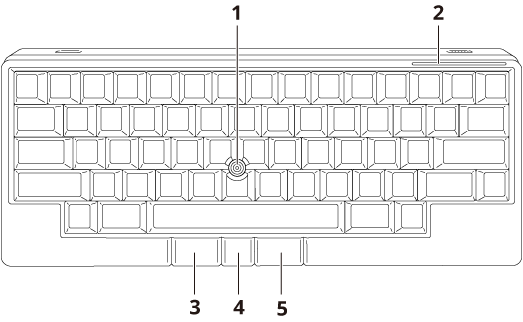
No. |
Name |
Description |
|---|---|---|
|
Pointing stick |
Push this stick with your finger in any direction to move the cursor on the screen. Hold down the mouse key center button and control the pointing stick to scroll the screen. For details, refer to How to Operate the Pointing Stick/Mouse Keys. |
|
LED indicator |
Indicates the keyboard status with its color and blinking/lighting. For details, refer to Status of the LED Indicator. |
|
Mouse key left button |
Functions as the left button on an ordinary mouse by default. |
|
Mouse key center button |
Hold down this button and control the pointing stick to scroll the screen. This button functions as the [Fn2] key by default and can change the movements of the pointing stick and gesture pads when used in combination with other keys. |
|
Mouse key right button |
Functions as the right button on an ordinary mouse by default. |
Back

No. |
Name |
Description |
|---|---|---|
|
Power switch |
Turns on/off the keyboard. |
|
USB Type-C connector |
Used with the USB Type-C cable provided with the keyboard, this connector allows you to connect the keyboard via USB and to supply power to the keyboard instead of using the batteries. This connector has no charging function for rechargeable batteries. |
Side
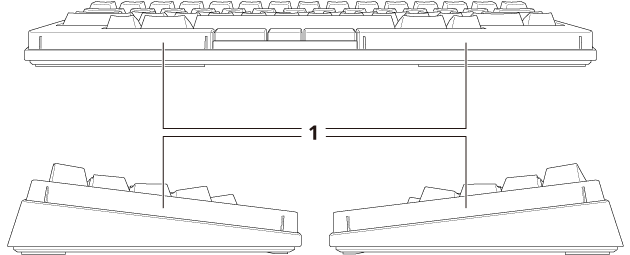
No. |
Name |
Description |
|---|---|---|
|
Gesture pad |
You can switch windows, scroll, and perform other operations intuitively by sliding the gesture pads with your fingers. For details, refer to How to Operate the Gesture Pads. |
Bottom
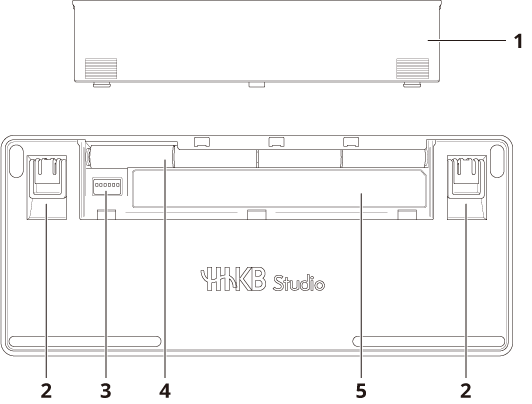
No. |
Name |
Description |
|---|---|---|
|
Battery cover |
Open this cover to insert/remove the batteries and turn the DIP switches Up (ON)/Down. On the reverse side of the battery cover, access information for the HHKB Studio web portal and shortcut keys are briefly described. |
|
Tilt stand |
Used to adjust the height of the keyboard. For details, refer to Adjusting the Keyboard Height. |
|
DIP switch |
Turn the switch Up (ON)/Down to change the keyboard settings. For details, refer to DIP Switch Settings. |
|
Battery box |
To use the keyboard with a wireless connection, insert four AA batteries. For details, refer to Using Batteries for Power Supply. |
|
Product label (device information) |
A label displaying the serial number (SER.NO.) and other information is attached. For contact and inquiries about maintenance and repair, you need the serial number (SER.NO.) of the device. Do NOT remove the product label. |