Key Combinations for Switching Pairing Modes and Operation Modes
Perform operations related to connection or input device operation adjustment using the following key combinations.
For details about each function and operation, refer to the link in the "Operation" column in the table below.
Operation |
Key Combination |
Status |
|
|---|---|---|---|
[Fn] + [Q] (pairing standby mode is switched to pairing mode) |
↓ The lights blink shortly in blue one after the other from side to side, and then the leftmost light blinks quickly in blue (five times per second) |
||
[Fn] + [Q] (the keyboard enters pairing standby mode) ↓ [Fn] + [Control] + [1] to [4] (the keyboard enters pairing mode) |
The lights light up one after the other from side to side ↓ The light corresponding to the device to be connected blinks quickly in blue (five times per second) (The figure shows an example of the LED indicator when the [Fn] + [Control] + [2] are pressed) |
||
[Fn] + [Q] (the keyboard enters pairing standby mode) ↓ [Fn] + [Control] + [Delete] + [1] to [4] |
The lights light up one after the other from side to side ↓ The lights turn off (the keyboard enters power saving mode) |
||
[Fn] + [Q] (the keyboard enters pairing standby mode) ↓ [Fn] + [Z] + [Delete] |
The lights light up one after the other from side to side ↓ The lights turn off (the keyboard enters power saving mode) |
||
[Fn] + [Control] + [1] to [4] |
The light corresponding to the device to be connected lights up in blue, then turns off (The figure shows an example of the LED indicator when the [Fn] + [Control] + [2] are pressed) |
||
[Fn] + [Control] + [0] |
All four lights light up in blue, then turn off |
||
[Fn] + [C] (the keyboard enters profile switching mode) ↓ [1] to [4] (Factory default: [1] Windows, [2] macOS, [3][4] not registered) |
The light corresponding to the number of the profile that has been applied blinks in white (once per second) (The figure shows an example of the LED indicator when Profile1 has been applied) ↓ The light corresponding to the number of the profile that has been switched to lights up in white, then turns off (The figure shows an example of the LED indicator when [2] is pressed) |
||
Checking the profile in use and the connected device |
[Fn] + [V] |
The LED indicators light up in the following order:
|
|
Turning off modes (pairing standby mode/pairing mode/profile switching mode) |
[Fn] + [X] |
The lights turn off |
|
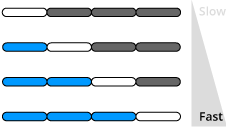
Speed 1 (slow) |
Mouse key center button + [1] (*1) (*2) |
The leftmost light lights up once in white |
|
Speed 2 |
Mouse key center button + [2] (*1) (*2) |
The leftmost light lights up once in blue and the second light from the left lights up once in white simultaneously |
|
Speed 3 |
Mouse key center button + [3] (*1) (*2) |
The two lights from the left light up once in blue and the third light from the left lights up once in white simultaneously |
|
Speed 4 (fast) |
Mouse key center button + [4] (*1) (*2) |
The three lights from the left light up once in blue and the fourth light from the left lights up once in white simultaneously |
|
Speed - (fine increments) |
Mouse key center button + [B] (*1) (*2) |
 The lights corresponding to the set value light up once in blue and white When the speed reaches the minimum or maximum, the LED indicator blinks in white twice |
|
Speed + (fine increments) |
Mouse key center button + [G] (*1) (*2) |
||
Low |
Mouse key center button + [6] (*1) (*2) |
The leftmost light lights up once in white |
|
Medium |
Mouse key center button + [7] (*1) (*2) |
The two leftmost lights light up once in white |
|
High |
Mouse key center button + [8] (*1) (*2) |
The three leftmost lights light up once in white |
|
Highest |
Mouse key center button + [9] (*1) (*2) |
All four lights light up once in white |
|
Enabled |
Not assigned (*3) |
All four lights light up once in white |
|
Disabled |
The lights at both ends light up once in white |
||
Left side enabled |
Not assigned (*3) |
The light corresponding to each gesture pad lights up once in white or turns off depending on the set value. The LED indicator status varies depending on the gesture pad settings. Each LED indicator light from the left shows the setting status of the gesture pad on the left side, front left side, front right side, and right side, respectively.
(The figure shows an example of a case where only the gesture pad on the left side is enabled and the others are disabled) |
|
Left side disabled |
|||
Front left side enabled |
|||
Front left side disabled |
|||
Front right side enabled |
|||
Front right side disabled |
|||
Right side enabled |
|||
Right side disabled |
|||
| *1: | The [Fn2] key is assigned to the mouse key center button on the keyboard by default. |
| *2: | You can change the key operation assignment using Keymap Tool. |
| *3: | Assigning the operation to a desired key using Keymap Tool enables this function. |